Configuration Example
In order to showcase how the functionality provided within the Processing tree can be used to configure Tornado, the following use-case will serve as a basis for a configuration example.
Understanding the Use Case
As a user I want to be able to passively monitor a host that sends SNMP trap with the status of its backup operations.
In order to perform this, we need to configure Tornado to receive SNMP events, make Tornado create the host if it does not exist, and set the status based on the result of the backup operation.
Prerequisites: The Edit mode is ON; the tenant is chosen in accordance with the application of the configuration.
Step 1. Create a Filter node to match SNMP Trap events
For the start a dedicated Filter node that would match all events of a particular type - SNMP Traps in this case - is to be created. For that, use the following operators:
{
  "type": "AND",
  "operators": [
    {
      "type": "equals",
      "first": "${event.type}",
      "second": "snmptrapd"
    }
  ]
}
You can also additionally create a Filter to match the events coming from a particular IP source, or create a dedicated rule for it in the following steps.
Step 2. Create a Ruleset node
Now, as the Processing tree is organized to catch SNMP Traps, optionally from a particular IP source, it is time to create a Ruleset and include a set of rules to process the events.
Name a Ruleset and procees to creating the first Rule winthin a Ruleset.
Step 3. Create a Rule to extract the variables required for defining an action in the following Rules.
In order to be able to define the action in a dedicated rule, it is first neccessary to extract the variables from the payoload of the event. Assuming the payload of an event is
{
    "dest_ip": "248.75.100.221",
    "oids": {
      "DISMAN-EVENT-MIB::sysUpTimeInstance": {
        "content": "(1617618274) 187 days, 5:23:02.74",
        "datatype": "Timeticks"
      },
      "SNMPv2-MIB::snmpTrapOID.0": {
        "content": "SNMPv2-SMI::enterprises.14604.2.2.0.1003",
        "datatype": "OID"
      },
      "SNMPv2-SMI::enterprises.14604.2.2.2.10.0": {
        "content": "default",
        "datatype": "STRING"
      },
      "SNMPv2-SMI::enterprises.14604.2.2.2.18.0": {
        "content": "3",
        "datatype": "INTEGER"
      },
      "SNMPv2-SMI::enterprises.14604.2.2.2.3.0": {
        "content": "Data Protection - Job Succeeded",
        "datatype": "STRING"
      }
    },
    "protocol": "UDP",
    "src_ip": "248.75.100.221",
    "src_port": "58953"
 }
in the ‘With’ clause create separate extractors for hostname, checkResult and
DetectedCriteria:
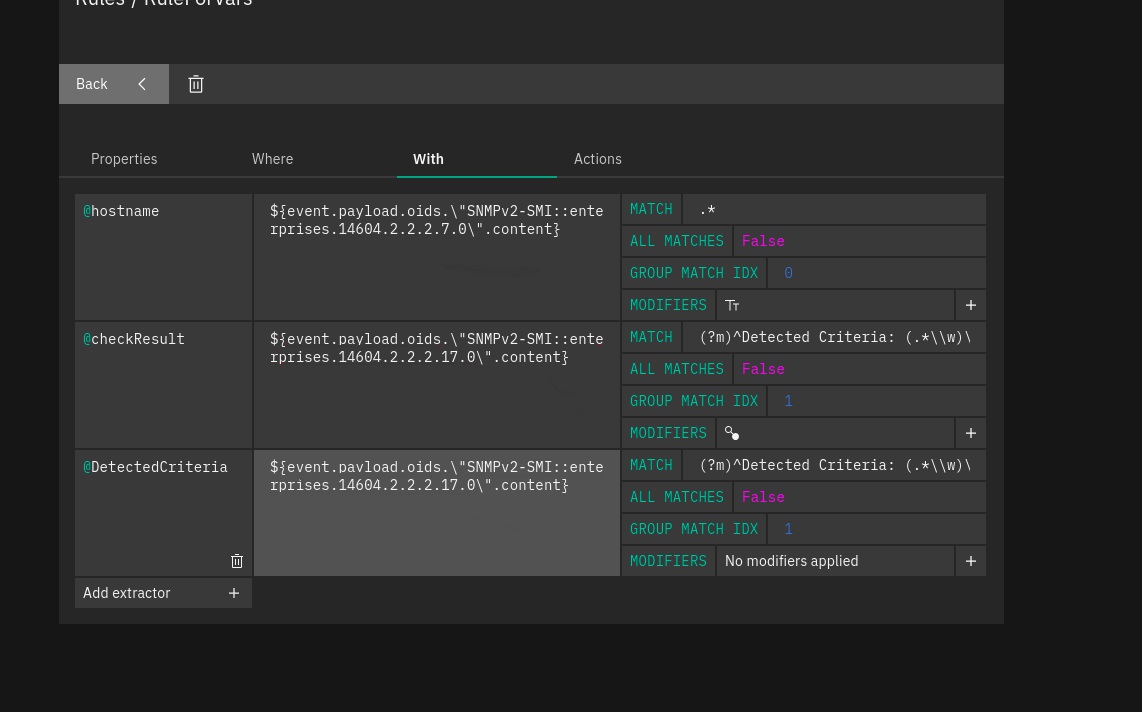
{
   "HostName": {
       "from": "${event.payload.oids.\"SNMPv2-SMI::enterprises.14604.2.2.2.7.0\".content}",
       "regex": {
         "type": "Regex",
         "match": ".*",
         "group_match_idx": 0,
         "all_matches": false
       },
       "modifiers_post": [
         {
           "type": "Lowercase"
         }
       ]
    },
    "checkResult": {
        "from": "\n${event.payload.oids.\"SNMPv2-SMI::enterprises.14604.2.2.2.17.0\".content}",
        "regex": {
           "type": "Regex",
           "match": "(?m)^Detected Criteria: (.*\\w)\\s*$",
           "group_match_idx": 1,
           "all_matches": false
        },
        "modifiers_post": []
    },
    "DetectedCriteria": {
       "from": "\n${event.payload.oids.\"SNMPv2-SMI::enterprises.14604.2.2.2.17.0\".content}",
       "regex": {
         "type": "Regex",
         "match": "(?m)^Detected Criteria: (.*\\w)\\s*$",
         "group_match_idx": 1,
         "all_matches": false
        },
        "modifiers_post": [
            {
          "type": "Map",
          "mapping": {
            "Job Succeeded": "0",
            "Job Succeeded with Errors": "1",
            "No Backup for last [0-9]+ Days": "2"
          },
          "default_value": "def_val"
        }
      ]
    }
}
Step 4. Add a Rule to define Actions required to create a Host and assign the status based on the extracted extracted variables
Add a Rule within the same Ruleset and go to Actions tab. Choose SMART_MONITORING_CHECK_RESULT type of action from a dropdown with available options.
Define the following parameters:
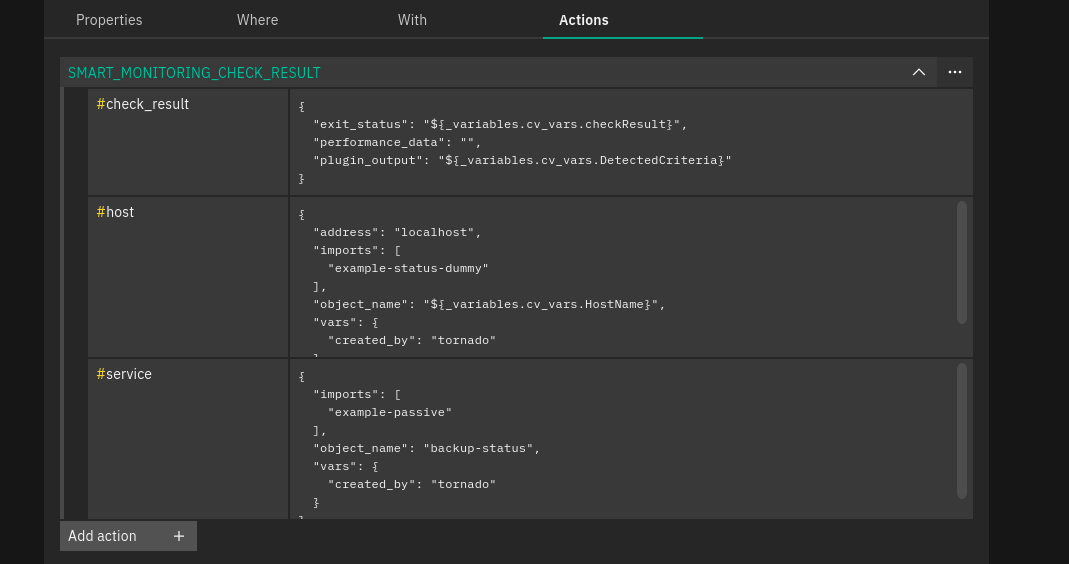
[
  {
    "id": "smart_monitoring_check_result",
    "payload": {
      "check_result": {
        "exit_status": "${_variables.cv_vars.DetectedCriteria}",
        "performance_data": "",
        "plugin_output": "${_variables.cv_vars.DetectedCriteria}"
      },
      "host": {
        "imports": "example-status-dummy",
        "object_name": "${_variables.cv_vars.HostName}",
        "vars": {
          "created_by": "tornado"
        }
      },
      "service": {
        "imports": "example-passive",
        "object_name": "backup-status",
        "vars": {
          "created_by": "tornado"
        }
      }
    }
  }
]
Step 5. Test Event whether it matches the rules you created within a ruleset.
Save the configuration and use Test Event panel in order to make sure the event matches the rules within the ruleset.
After all the changes have been saved, test the Event to see if the filter structure and rules conditions were configured properly.
Open test event panel and provide all neccessary event data, then Run test. At this point, a rule can be in one of the following states:
matched: If a rule matched the Event.stopped: If a rule matched the Event and then stopped the execution flow. This happens if thecontinueflag of the rule is set to false.partially matched: If where condition of the Rule was matched but it was not possible to process the required extracted variables.not matched: If the rule did not match the Event.
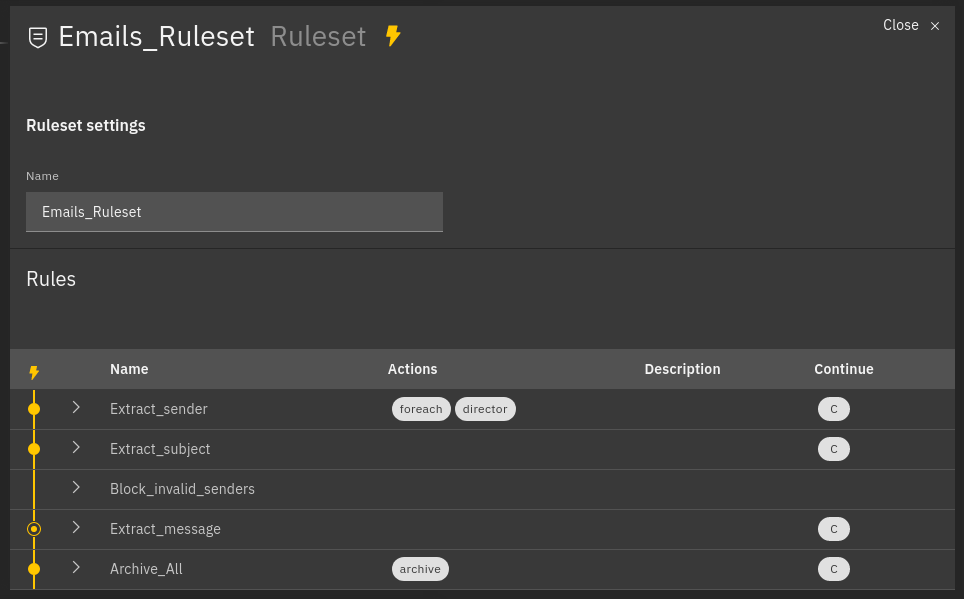
Fig. 158 Example of processed rules
Matched rules: Extract_sender, Extract_subject, Archive_all
Partially matched: Extract_message
Not matched: Block_invalid_senders
For each rule in the table, the extracted variables and the generated Action payloads are shown. Two other buttons are visible, one for cleaning all the fields of the form and one for cleaning the outcome of the test.
If you prefer to check if the host/service is actually created in the Dashboard and the status is assigned as a result of the match, enable the action execution in the Test Event panel when running a test.
Step 6. In case of a success, deploy the configuration to production.
This can be with the help of a deploy button in the top right corner of the Processing Tree layout, next to ‘Save’ option.
In the case of muliti-tenant environment, a deployed configuration is applied on a particular tenant it was created for. For a single-tenant environment, the configuration is applied to the Master Tenant only.
As result, a host/service is created in the Dashboard, monitoring result being mapped on Icinga Service.