Cluster Upgrade from 4.43 to 4.44
This guide will lead you through the steps specific for upgrading a NetEye Cluster installation from version 4.43 to 4.44.
During the upgrade, individual nodes will be put into standby mode. Thus, overall performance will be degraded until the upgrade is completed and all nodes are revoked from standby mode. Granted the environment connectivity is seamless, the upgrade procedure may take up to 30 minutes per node.
Warning
Remember that you must upgrade sequentially without skipping versions, therefore an upgrade to 4.44 is possible only from 4.43; for example, if you have version 4.27, you must first upgrade to the 4.28, then 4.29, and so on.
Breaking Changes
Icinga2 zones and endpoints
From NetEye 4.44 all zones and endpoints configurations of Icinga2 will be managed through the Director instead of templating configurations of the file system, to allow easier management, updates and a future-proof procedure.
Existing endpoints and zones created automatically by NetEye need to be migrated, with the dedicated command, before the upgrade to NetEye 4.45. For more information, please refer to the Additional tasks section.
Elastic Stack upgrade to 9.0.6
In NetEye 4.44, Elastic Stack upgrades from version 8.18.6 to 9.0.6. To ensure compatibility, review the official breaking changes linked below:
Here are highlights of the breaking changes in this version:
Kibana
Access to Kibana’s internal APIs is now blocked. If you have any integrations that rely on endpoints under
<kibana_url>/api/internal/, please update them to avoid using these APIs before upgrading. More details here.
Logstash
Elastic 9 removes deprecated SSL settings in some Logstash plugins and replaces them with updated settings. If your plugin configuration contains any obsolete options, the plugin may fail to start. To avoid problems during the upgrade, please rename deprecated settings in your Logstash pipelines to use the new names, which are valid also in version 8.18. Here are some examples of how to address deprecated settings:
BEFORE:
input {
  beats {
      port => "${INPUT_BEATS_PORT:5044}"
      client_inactivity_timeout => 300
      ssl => true
      ssl_certificate_authorities => "${LS_SETTINGS_DIR}/certs/root-ca.crt"
      ssl_certificate => "${LS_SETTINGS_DIR}/certs/logstash-server.crt.pem"
      ssl_key => "${LS_SETTINGS_DIR}/certs/private/logstash-server.key"
      ssl_verify_mode => "force_peer"
      enrich => "ssl_peer_metadata"
  }
}
AFTER:
input {
  beats {
      port => "${INPUT_BEATS_PORT:5044}"
      client_inactivity_timeout => 300
      ssl_enabled => true
      ssl_certificate_authorities => "${LS_SETTINGS_DIR}/certs/root-ca.crt"
      ssl_certificate => "${LS_SETTINGS_DIR}/certs/logstash-server.crt.pem"
      ssl_key => "${LS_SETTINGS_DIR}/certs/private/logstash-server.key"
      ssl_client_authentication => "required"
      enrich => "ssl_peer_metadata"
  }
}
Notice how in the example above we have a beats input, where the deprecated settings
sslandssl_verify_modewere replaced by the new settingsssl_enabledandssl_client_authenticationrespectively.For more details, check out official documentation.
External Logstash plugins that you installed manually may also cause breaking changes during the NetEye upgrade process. During a NetEye upgrade, all Logstash plugins are automatically updated to their latest available versions, which is why it is important to check for any breaking changes that might affect your configuration.
To list manually installed plugins, run the command
python3 /usr/share/neteye/logstash/scripts/configurator/logstash_plugin_manager.py additional-plugins-installed. Then, for each plugin, visit plugins’s site to check if there are newer versions available compared to your currently installed version, and review the changelog for any breaking changes between versions.For example, if you manually installed the Extractnumbers filter plugin, check the plugin version currently installed and verify in the plugin’s changelog if latest available version has any breaking changes compared to yours. If so, apply any necessary configuration changes to accommodate the breaking changes before upgrading.
Elastic Agent
Support of Elastic Agents version 7 is dropped. If Logstash receives logs from Elastic Agent version 7, it will discard them. Update all Agents to version
>= 8.18before upgrading NetEye. Refer to the official documentation for supported Agents by version.
Beats
Support of Beats version 7 is dropped. If Logstash receives logs from Beats version 7, it will discard them. Update all Beats to version
>= 8.18before upgrading NetEye. Refer to the official documentation for supported Beats by version.The
Loginput of Filebeat is deprecated. If you are using theLoginput of Filebeat, please migrate it toFilestreaminput before upgrading Filebeat to version 9. Have a look at the official migration guide for more details.
Groups User Backend and Groups in Access Control and Roles
From NetEye 4.44, the Full Groups Path feature in Keycloak will be enabled
by default. This has an impact on the Access Control and Roles
configuration in NetEye, namely on the Group field. Here, all groups must
be specified with their full path, e.g. /icingaadmins instead of just
icingaadmins. An automatic procedure will be executed during the upgrade to
update all existing roles and access control rules to use the full group path.
Also, a prerequisite check will ensure that only the keycloak-master User
Group backend is configured in the Access Control Backends section. If
multiple backends are configured, the upgrade will be aborted, and you will be
required to remove all other backends except keycloak-master. To learn more
on this feature, please refer to the Authorization section
of this documentation.
CSP Header
Since version 4.42, having the Content-Security-Policy (CSP) header enabled has been a security prerequisite. Building on this, version 4.44 completes the transition to a more secure-by-default posture by making this setting active and can no longer be disabled.
PCS Redis Resource Configuration
The Redis service, required for IcingaDB, has been moved to the Core NetEye module. Before proceeding with the upgrade, ensure the resource is configured correctly by following these steps.
Warning
If the Redis PCS resource is already configured (for example, because the ntopng NetEye feature module was previously installed), you can safely ignore this breaking change.
Copy the template file
/usr/share/neteye/redis/cluster/Services-core-redis.conf.tplto/usr/share/neteye/redis/cluster/Services-core-redis.conf.Edit the new configuration file to match your cluster environment.
Synchronize the updated configuration file across all cluster PCS nodes.
In the NetEye web interface, navigate to
Configuration > Modules > NetEye > Configurationand enable the corresponding checkbox for the Redis PCS resource.
This ensures Redis is properly set up for IcingaDB in your upgraded environment.
Prerequisites
Before starting the upgrade, carefully read the latest release notes on NetEye’s blog and check the features that will change or be deprecated.
All NetEye packages installed on a currently running version must be updated according to the update procedure prior to running the upgrade.
NetEye must be up and running in a healthy state.
Disk Space required:
3GB for
/and/var150MB for
/boot
If the NetEye Elastic Stack module is installed:
The rubygems.org domain should be reachable by the NetEye Master only during the update/upgrade procedure. This domain is needed to update additional Logstash plugins and thus is required only if you manually installed any Logstash plugin that is not present by default.
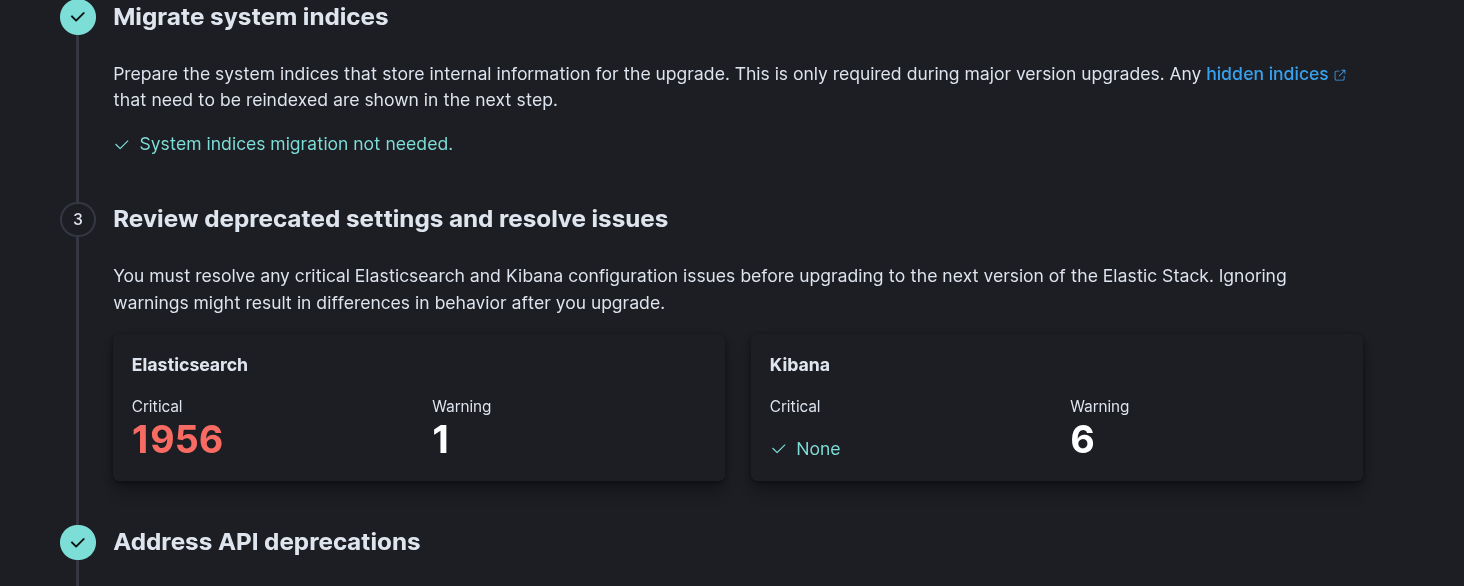
The deprecated SSL settings in the Logstash plugins must be updated. Once the changes have been applied, you can verify their correctness by running the command
neteye node check-upgrade-prerequisiteson the node where the Logstash service is running.Ensure that there are no critical issues for Elasticsearch and Kibana in the Kibana Upgrade assistant. Go to: Log Analytics > Stack Management > Upgrade Assistant . The example below shows 1956 critical issues that must be resolved before proceeding with the upgrade.
Note
In certain cases, the Upgrade Assistant UI in Kibana may not display any critical issues, even though the corresponding upgrade prerequisite check command still reports some. This can occur, for example, when a node’s disk usage exceeds the watermark threshold.
If this happens, please visit the following URLs to view the complete list of critical issues:
<neteye_url>/neteye/kibana/kibana/api/upgrade_assistant/es_deprecations<neteye_url>/neteye/kibana/kibana/api/deprecations
Note
If you encounter warnings regarding the deprecation of xpack monitoring in Elasticsearch or Kibana (such as the one shown in the screenshot below), you should ignore them. NetEye will automatically take care of these issues during the upgrade process.

Confirm that you reviewed the Elastic breaking changes, by enabling the dedicated flag in the NetEye UI that you can find on URL
<neteye_url>/neteye/kibana/config
NetworkManager Migration
Please, make sure that you have migrated all of your nodes to use the NetworkManager as described in the Additional Upgrade Tasks section.
1. Run the Upgrade
The Cluster Upgrade is carried out by running the following command:
cluster# (nohup neteye upgrade &) && tail --retry -f nohup.out
Warning
If the NetEye Elastic Stack feature module is installed and a new version of Elasticsearch is available, please note that the procedure will upgrade one node at the time and wait for the Elasticsearch cluster health status to turn green before proceeding with the next node. For more information, please consult the dedicated section.
After the command was executed, the output will inform if the upgrade was successful or not:
In case of successful upgrade you might need to restart the nodes to properly apply the upgrades. If the reboot is not needed, please skip the next step.
In case the command fails refer to the troubleshooting section.
2. Reboot Nodes
Restart each node, one at a time, to apply the upgrades correctly.
Run the reboot command
cluster-node-N# neteye node reboot
In case of a standard NetEye node, put it back online once the reboot is finished
cluster-node-N# pcs node unstandby --wait=300
You can now reboot the next node.
3. Cluster Reactivation
At this point you can proceed to restore the cluster to high availability operation.
Bring all cluster nodes back out of standby with this command on the last standard node
cluster# pcs node unstandby --all --wait=300
cluster# echo $?
0If the exit code is different from 0, some nodes have not been reactivated, so please make sure that all nodes are active before proceeding.
Run the checks in the section Checking that the Cluster Status is Normal. If any of the above checks fail, please contact our service and support team before proceeding.
Re-enable fencing on the last standard node, if it was enabled prior to the upgrade:
cluster# pcs property set stonith-enabled=true
4. Additional Tasks
Migration of Icinga2 zones and endpoints to the Director
Before the upgrade to NetEye 4.45, it is necessary to migrate existing Icinga2 zones and endpoints configurations created automatically by NetEye in previous versions, to be managed through the Director.
To achieve this, a dedicated command is provided to facilitate the migration process.
You can so run, from one node of your NetEye environment the following command to perform the migration:
neteye# neteye icinga zones-endpoints migrate
Warning
Please note that the command will automatically perform a Director deploy, so ensure that when launched the current configuration is consistent and ready for deployment.
Note
The command will migrate only existing zones and endpoints that were created automatically by NetEye in previous versions, such as the ones created during satellites configurations. It will so not affect any manually created zones and endpoints.
Note
Until the migration is completed, the configuration for existing satellites can be still generated but will not include changes performed on the icinga2 zone, if altered. To apply changes to the icinga2 zone, you must complete the migration process first.
For more information about the command, please refer to neteye icinga zones-endpoints migrate.